â
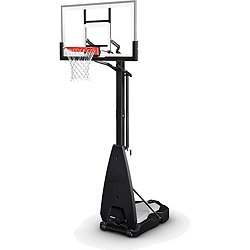
Discover the perfect spalding basketball hoop mount to enhance your game and elevate your court experience. Designed for durability and stability, these mounts ensure your hoop stays securely in place, allowing for intense play without worry. With easy installation options and adjustable heights, you can customize your setup to suit players of all ages and skill levels. Crafted from high-quality materials, these mounts are built to withstand the elements and provide long-lasting performance. Transform your driveway or backyard into a professional-grade basketball court with our reliable hoop mounts.

$44.99
The final bracket set up is very solid! ... Thankyou for fast shipping. ... [ Bracket works very
5
Mike f.
[ Bracket works very well! Thankyou for fast shipping..
5
David S.
[ It took me a couple of layouts with the brackets for a pole mounted back stop. The final bracket set up is very solid!

$1699.99
I put it together myself, so it is possible, but it would be easier with a buddy. ... Strong, Durable Basketball Hoop ... The poles are heavy, which is good, but require some
5
Bryan20
I had a wonderful experience assembling my new 54 ” Beast with my son. The instructions were very clear and the parts were well packaged in a way that made finding what was needed each step of the way straightforward.
5
Dr T
This thing was delivered in 3 massive boxes on a pallet, and stood in our garage for 3 weeks. Finally got around to building it yesterday. It took 7 hours, but the end results was beautiful. A super- wide plastic funnel for filling in sand would have been helpful to include in the kit, but we improvised with a plastic bottle.
5
Knight
We ’ ve had this set up for about 2 weeks. Family, especially the boys are really enjoying it. Assembly wasn ’ t as difficult as I expected.
5
dkreale
Overall the hoop is great. I put it together myself, so it is possible, but it would be easier with a buddy. Love the glass backboard and breakaway rim. The base is sturdy and the construction of this basket is one that should last a lifetime. Thank you,
5
NERVOUS
First and foremost, let me say I 'm greatful for the previous reviews on this site and others. Things I found especially helpful from other reviews:- Recommendation to lightly sand the inner/outer surfaces of the two main poles before trying to join them. I 've read horror stories of this step taking hours to complete, but thanks to the recommendations I read before trying it myself it was done in ~10 minutes.- Recommendation to read through the assembly instructions carefully before delivery... To make sure you have the appropriate tools, etc. From beginning to end, the entire process took ~5 hours. To be fair, this included several breaks for things like eating lunch, playing with the kids, etc... I took my time and was deliberate with each step. Also, I did a majority of the work by myself. I did have assistance when needed from my two kids( ages 7 and 9) as well as my wife. NOTE: You will definitely need at least one other able- bodied adult to complete several of the steps involved in assembling this product. My initial impressions of the product after putting it together are, `` It's very well- made! '' After using it for a couple of weeks, I still have the same opinion. In short, I 'm very happy with this purchase and fully expect this product to last for many years! Other thoughts that have crossed my mind:- 60 '' glass backboard with pro- style breakaway rim is visually impressive; especially for a portable system.- I had my doubts about the 'portability' of this system given its size, but I have to admit it's fairly easy to move around, even on a slight grade.- The square two- piece main pole is quite stout and the elevator arm height- adjustment system is well- designed. The result is a very realistic indoor court 'feel' to the backboard and 'bounce' to the rim( at any height); which is hard to find in a portable system.

$1499.99
Very solid and spaulding had great customer servic ... Super stable system with just the water filled in the base. ... I found it easier to lay the base on its side and I supported the pole on top of one of the steps of my step ladder to get the pole to the proper
5
Cking925
Recently purchased this hoop as a gift for my 11 yr old daughter who plays CYO basketball. After a few days of online research and store visits I was confident this model was the correct setup for her needs and our budget for a portable hoop system. The main features that sold me on this unit were the large backboard and the dual weighting method of both water and sand bags. In advance of my installation review I will tell you the pros and cons of the hoop post installation. Pros: 1. Super stable system with just the water filled in the base.( I have added sand bags into the base and 2 ground screw anchors( into the adjacent grass) with ratcheting straps for additional safety.) 2. The backboard has superb bounce/feel. We all know portable hoops are infamous for a non- realistic “ feel ” when a shot goes off the backboard, but this model is amazing! Not only are shots received well off the backboard but the entire hoop system is stable and does not shake or rattle like other units I have played on before. 3. Ease of adjustment up and or down which my11 yr old and 7 yr old can operate on their own. Easy to move as well. Please note I only moved the hoop post assembly and before I filled it with water. I would imagine it would be more difficult to do after it is filled with water and probably produce unwanted stress on the support poles when trying to do so. I also adjusted the hoop height to the lowest level to make it a bit easier to move into its playing position. 4. Impressive overall size. While the system itself does not take up a huge amount of real estate the size of the backboard and hoop is great in comparison to others I have researched and played on. 5. Amazing quality. Even though there were other more expensive units and many less expensive units I truly believe this was the best value and quality for the price point. Cons: 1. The protective removable plastic film over the backboard gets stuck in the perimeter of the metal surround. I know this sounds petty, but they must apply this removable file over the backboard and then screw the metal surround on during manufacturing. What happens is when removing the film portions of it still remain between the metal surround and the backboard and are impossible to remove. This is more of an aesthetics issue as it does not affect the performance of the hoop but I am a perfectionist. 2. Believe it or not I have nothing else. The hoop met my expectations after my extensive research and comparisons. Shipping: 1. The box came from a freight forwarder. They contacted me to schedule a delivery date and time and arrived on time. It was unloaded and brought to my side yard. The overall package size was much smaller then I was anticipating but was heavy. You will need a furniture dolly or hand truck to move it around by yourself or 2 people. Assembly:( Assembly took approximately 3 hrs and 20 minutes with 1 person) 1. The parts and pieces in the box were packaged very well. After unboxing I suggest going through the manual to organize your main assembly parts and hardware according to the various stages to make assembly more efficient. This is definitely an item that needs to be installed outside unless you have very high ceilings/rafters in your garage. 2. Tools and Equipment needed:* Tape measure* Wood board( for assembly main poles together.( I used a 2x8 I had)* Saw Horse( I used a standard plastic saw horse)* Ladder or step ladder 8ft tall* Flat head screwdriver* Phillips head screwdriver*( 2) 3/8 ” closed/open ended wrenches*( 2) 1/2 ” closed/open ended wrenches*( 2) 9/16 ” closed/open ended wrenches*( 2) 3/8 ” sockets and socket wrenches*( 2) 1/2 ” sockets*( 2) 5/16 ” sockets*( 2) 9/16 ” sockets*( 2) 3/4 ” sockets* Socket wrench extension* Center punch* Adjustable box wrench* Hammer or mallet( I used a plastic weighted mallet to protect the paint) 3. The assembly instructions are pretty straightforward and provide ample description and illustrations to guide you. Below I will list my lessons learned during assembly and what step& page number of the assembly manual I am referencing to help anyone who is reading this and about to assemble one in the future. Step 3( page 23) Make sure to take your time on this step as it is super critical to get correct. After you have measured and taped your 0 ’- 3 1/2 ” line on your middle and bottom pole it is time to connect the middle pole to the top pole. Make sure your properly align the middle pole and top pole so that the vertical trough, or indent, on the middle pole is perfectly aligned with dimple/bump on the top pole. When bouncing, or picking up and hitting onto the wood, the two poles together against the piece of wood on the ground make sure your are making even contact on the top pole to the wood so that the pole connects evenly and is not skewed. Step 4( page 24) The same principle as noted in step 3 above pertains to step 4. Only this time you will be bouncing the previously connected middle and top piece assembly into the bottom piece. This time there will be a vertical trough/indent on the bottom pole that will align with the dimple/bump on the middle pole. Again take your time to properly align. I also suggest standing on a step ladder when doing this section to get a higher hold on the pole producings better bounce onto the wood for proper connection. For both Step 3& step 4 the goal is to make sure the poles connect and reach your 0- 3 1/2 ” tape mark ensuring you have proper overlap of the connecting poles for proper assembly. Step 5( page 25) This was one of the more awkward steps. I found it easier to lay the base on its side and I supported the pole on top of one of the steps of my step ladder to get the pole to the proper position. I was then able to install the base plate and( 2) bolts for this step. Make sure you have the pole oriented in the correct position as you do not want to start all over at later stages if your pole is 180 degrees off. Step 11( page 31) This step looks tricky but just layout your pieces for each upper tube assembly and each lower tube assembly so that you have it “ mocked ” up before installing. For me it was easier installing the lower tube assembly with the triangle bracket first. Then I installed the upper bracket assembly. The most important part of this step is to NOT over tighten the bolt and lock nut. The diagram on page 31 shows that you have sufficiently tightened the bolt once the bolt end is flush, or even, with the outside face of the lock nut.( Over tightening these will make it difficult to lower and raise the hoop post assembly) Section B Step 1( page 33) My only tip here is to make sure you are on an even surface with the base and the sawhorse. Also I would suggest placing several pieces of cardboard or a mat to protect the face of the backboard when doing this step. Section B Step 2( page 34) My advice here is DO NOT over tighten. Use hand tools only and do not use an electric or air ratchet for this as you could crack the backboard. Section B Step 4( page 37) Do not over tighten these screws as they will strip the threads and continue to spin... trust me I did this. I fortunately had larger screws that I was able to make work after re- threading these. Everything else is pretty straightforward and easy to do. Don ’ t forget to purchase a few bags of sand( buy the bags of sand in plastic bags and you can place them in black garbage bags to protect them from getting wet in the elements. I would not recommend placing the sand directly into the base compartment as it would make a mess and be difficult to remove if you ever want to move the entire hoop assembly to another location. I hope you all enjoy the hoop as much as we are!! Cheers, Chris
5
WCS_12
I bought this hoop for my sons( ages 6 and 10) to replace a 13 year old system that had seen better days. The upgrade in quality was immediately noticed after the system installation was complete. The backboard response is incredible, and prepares the children well for gym play now that they are both involved in team sports. Another great improvement is the height adjustment system. Once set up, the goal can be easily raised and lowered to accommodate the age difference between my children. No more using a broom stick to adjust the goal height.:-) Finally, I hired a professional installation service to assemble the goal, which took the installer just under 2 hours to complete by himself. I have seen other reviews that complained about the installation instructions, but my installer, although experienced, had no complaints. In his words, it was one of the better systems that he has seen.
5
Rynner
We just assembled our hoop system and are very happy with it. I had two friends( who are handy) help me and, together, we assembled the system in about 2. 5- 3 hours. The directions were clear, although it would have been easier to read them if there were separate booklets for each language. The tip video on YouTube was really helpful to see some of the finer points of key assembly elements. We had all the parts we needed, but I wish that the bags of assembly parts had been more clearly labeled with the contents inside to save us a few minutes of cross- checking. That said, use of the the measuring tape and part reference page was enough for us. As soon as the hoop was up, my kiddo was out shooting baskets. We haven ’ t yet put the water in the base and are relying on sand until the freeze passes. Even so, the hoop is stable and the backboard performs well. IMO, this system is a great value. Make sure you factor costs for assembly help or friend favors into your budget when you consider the overall purchase. This project definitely requires at least two people for assembly.
5
John
Got this to replace an in- ground 60 '' after a move. Somewhat leary about a portable coming from that, but after researching I really liked the hybrid options for moving more easily and not having to drain water or sand every time. That in itself is a great feature. I can move 4- 5 bags of sand in a couple minutes and re- adjust the hoop. It's not light which is good, but it is very manageable. I was able to roll it through grass without too much trouble, but this was before putting water in the base. The wheels roll well enough, but are very short so a smooth surface is obviously the best for moving. The construction itself was not overly difficult, I did it mostly alone only asking help to stand it up. Being very cautious to read the instructions several times and inventorying, assembly took about 3- 4 hrs. Tip: you really want to make sure to align the poles well and put the top 2 pieces together before the bottom. Playability- wise it's very solid. Some vibration on side, off angle shots and louder thuds with the back board than tempered glass, but not bad. I think it was a very good purchase and recommend this especially at 60 '' which you do n't find often for portables. Shipping took 7 days, but hassle to schedule the freight. Just a note the backboard was cracked with a 5 '' hole upon delivery, but was able to call same day and had a new backboard in 4 days. Nice service!
5
V and E
I bought this 2 weeks, excellent hoops in the backyard, spent 4- 5 hours to install it. Love the product especially during the self quarantined period, stay healthy


$84.99
We ordered the Pro Slam Basketball Rim as a replacement, it fit perfectly and was easy it install. ... This was delivered sooner than estimated and was super easy to
5
Bill
Wind storm blew down my backboard and damaged the rim. Ordered a replacement, which came to me sooner than expected. Quickly( 15 minutes, max) and easily replaced, and life is good again!
5
Clintoncdc
Thanks for the quick delivery. Rim works great with the old hoop
5
Chiefed8r1
The website was easy to navigate and shipping was fast. Easy transaction.
5
L.Brown
I bought this rim to replace our `` egg shaped '' rim. After a couple of severe wind gusts and our goal landing rim side down we needed a replacement. This was delivered sooner than estimated and was super easy to install.
5
Emily G.
[ Our basketball goal was knocked over during a bad storm and the rim bent out of shape. We ordered the Pro Slam Basketball Rim as a replacement, it fit perfectly and was easy it install.

$549.99
I bought this hoop in May to mount on my garage and it has worked out great. ... Very sturdy basketball hoop and I definitely recommend ... It works great and was fairly easy to
Basketball hoop mounts come in various types, including in-ground, portable, and wall-mounted options. Each type is designed for specific installation needs and preferences, allowing users to choose based on their available space and intended use. Understanding the differences can help you select the best mount for your playing environment.
Basketball hoop mounts are typically made from durable materials such as steel, aluminum, or heavy-duty plastic. These materials are chosen for their strength and resistance to weather conditions, ensuring longevity and stability. It's important to consider the material when selecting a mount, as it can affect the overall durability and performance.
The right height for a basketball hoop mount usually depends on the age and skill level of the players. For youth players, a lower height may be appropriate, while standard regulation height for adults is 10 feet. Adjustable mounts are available, allowing for easy height modifications as players grow or improve their skills.
When installing a basketball hoop mount, consider the location, surface type, and stability requirements. Ensure the area is free of obstructions and has a suitable surface for installation, whether it's concrete, grass, or asphalt. Additionally, check local regulations regarding installation and safety to ensure compliance.
Key features to look for in a basketball hoop mount include adjustability, ease of installation, and stability. Adjustable mounts allow for height changes, while easy installation features can save time and effort. Stability is crucial for safety and performance, so look for mounts that provide a secure and sturdy setup.
Yes, many basketball hoop mounts are designed for both indoor and outdoor use, but it's essential to choose one that is suitable for your specific environment. Outdoor mounts should be weather-resistant to withstand the elements, while indoor mounts may focus more on aesthetics and space-saving designs. Always check the specifications to ensure compatibility with your intended setting.
Continue browsing